Intro to workspaces
Rất tiếc! Có vẻ như trình chặn quảng cáo của bạn đang ngăn không cho phát video.
Vui lòng xem trên YouTube

Everything you do in Notion takes place in a workspace. It's your virtual home to organize information and create exactly the way you want — as just one person, together as a team, or across a whole company. Expand, edit, and mold it to fit your needs.
Chuyển đến Câu hỏi thường gặpYour Notion app interface is split into two sections: the sidebar and the editor.
Sidebar
Notion's expandable sidebar is your navigation system.
All the pages and databases you create will appear here.
The sidebar contains several sections, which you can reorder and customize.
You can nest pages inside each other for infinite levels of organization.
It's also home to your settings, trash, and other tools.
Learn more about your sidebar in this article →
Editor
This is where all the content you create lives.
Control menus are at the top (we'll go through those in more detail), but otherwise, Notion's editor is a blank canvas for you to write, plan, brainstorm, and more.
You'll notice that as soon as you start typing in this space, those top menus fade into the background, leaving you with your thoughts in a spacious zone of focus.
Control panel

The control panel at the top of your sidebar contains several key features:
Workspace switcher: Click on your current workspace's name to switch between the workspaces you belong to, create a new one, join another one, or log out. You can also access your settings from inside the workspace switcher. Learn more about switching workspaces here →
Search: Click to open Notion's search window, where you can either type in what you're looking for or quickly jump to a recently visited page. Learn more about Search here →
Home: Click to see the pages and tasks that need your attention. Learn more about Home here →
Meetings: Click to see upcoming meetings and notes so you can quickly prep for a meeting, or review what happened after.
Notion AI:Click to search and research with Notion AI. Learn more about Notion AI here →
Inbox: Click to see all your notifications in one place. This menu combines revisions that were made on pages you follow, mentions of you across your workspace, and new work assignments. A red notification badge will appear here when you have unread notifications. Learn more about inbox here →
Library: Click to browse and manage all content across your workspace. Learn more about Library here →
Sidebar sections

Your sidebar contains various sections to keep your workspace’s content organized:
Teamspace: This section is accessible for users on paid plans to manage the various teams or groups that may be working in Notion. Learn more about teamspaces here →
Shared: This section contains pages that you and select others in your workspace have access to.
Private: This section is home to pages that only you have access to.
Favorites: This section houses pages that you’ve favorited so you can reference them easily.
You can rearrange and customize your sidebar sections. Learn how in this article →

Mẹo:
Nhấp vào tên của một phần thanh bên —
Không gian nhóm,Đã chia sẻhoặcRiêng tư— để thu gọn phần đó và giữ cho thanh bên của bạn gọn gàng.Nhấp và kéo các phần thanh bên của bạn để sắp xếp lại chúng.

Note: If you drag a page into Private in your sidebar, everyone but you will lose access.
Favorites
Favorites is where you can easily access all of the pages most important to you. This section will appear in your sidebar once you favorite your first page.
To add a page to your favorites, navigate to it, then click ⭐ at the top of it. You'll see it appear under Favorites in your sidebar.
To remove a page from your favorites, open it and unclick ⭐ at the top. You can also hover over the page in your sidebar and click •••. You'll see the option to Remove from Favorites.
Tip: Favorites are helpful for stashing pages relevant to your current projects. You can easily add or remove them as your workflow and priorities change.
Settings, templates, and trash
Settingsallow you to adjust Notion to your preference. Learn more about settings here →Marketplaceopens our template picker, where you can create a new page using starter content to help you accomplish your goals.Trashcontains all the pages you delete. You can drag and drop them in here. You can also click on trash to search, view, and restore these pages.
Create a new page
There are a few ways to add a new page in Notion.
Click
📝at the top of your left sidebar.If you’re on the desktop app, use the shortcut
cmd/ctrl+N.If you’re on mobile, tap
📝at the bottom of your screen.
Hover options
When you hover over a page in your sidebar, you'll see both a + button to add a page nested inside it, and a ••• icon, which opens a menu of actions you can apply to the page: Delete, Duplicate, Copy link, Rename, and Move to.
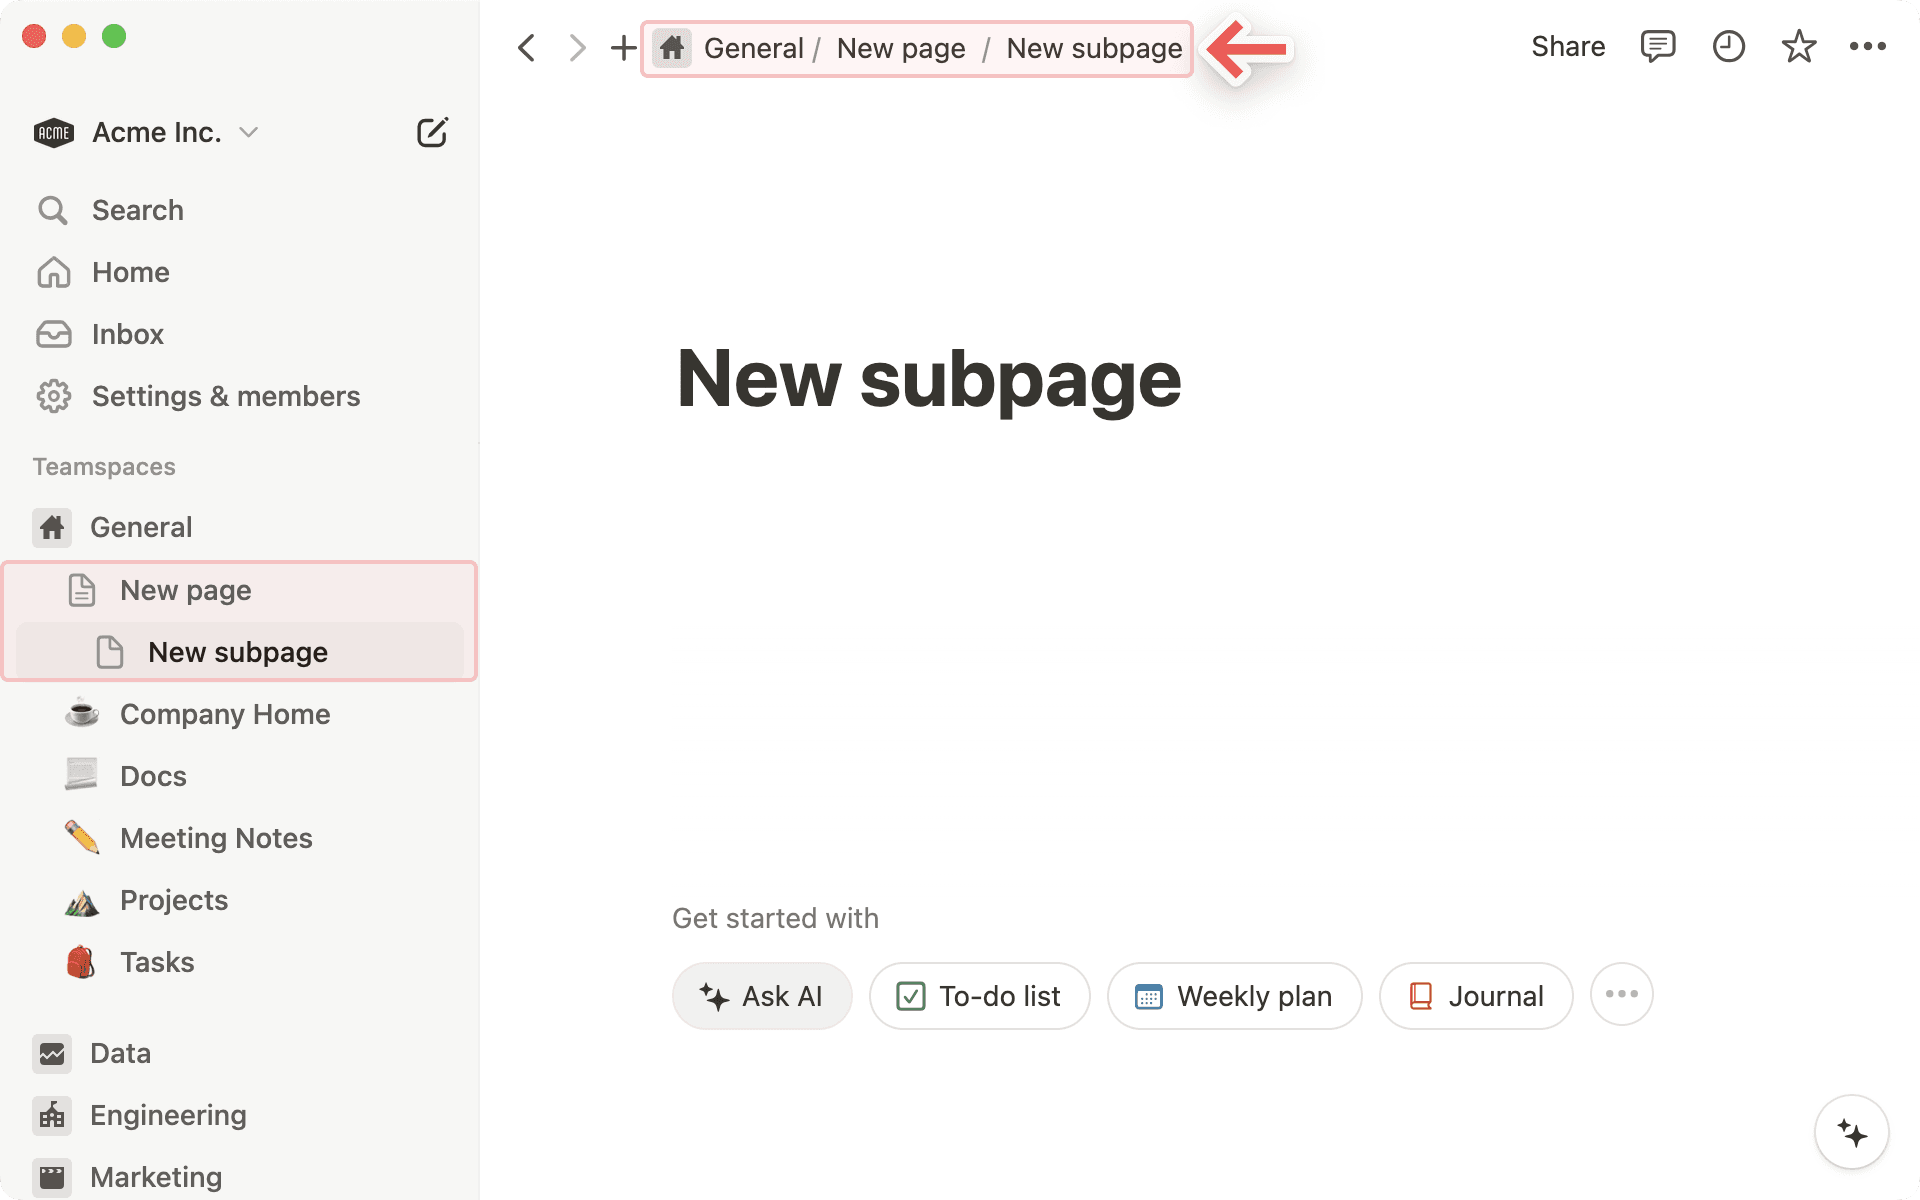
Breadcrumb navigation
Always know where you are in respect to your page structure. See how the page you're currently looking at fits into other pages.
You can click on any page in this breadcrumb to immediately jump to it. Sometimes this will be abridged with a
...— click to view all the pages in between.
Collaborators
You can see the profile photos of everyone else who has access to the page you're on. If you hover over any of them, you can see the full list, their names, and email addresses.
Greyed out avatars are people who are not currently viewing the page but have access to it.
When you collaborate in real-time on the same content, you can see people's photos moving around, corresponding to the block they're reading or editing.

Share menu

Each row in this menu represents a different person or group of people you can share the page with. The dropdown menus on the right let you set their level of access. Learn more about permissions here →
Copy linkcopies the page's unique URL to your clipboard so you can share it with whoever you want. Still, only people with access to the page can see it.Invitelets you add people both inside or outside your workspace to a page using their email address. Learn more about sharing here →
••• menu

This menu contains many options, including:
Lock page: Turn this on to prevent any edits from being made. This is good for preventing accidental edits on very important pages.Lock database: This option is only available for full page databases. When you turn this on, people can still enter data, but they can’t change views or properties.Customize page: Toggle the visibility of backlink and page comment sections.Move to: This opens up a menu where you can choose any other workspace or page to move the current page into.Updates & analytics: See what changes have been made to a page, how many times the page has been viewed, who created the page, and more.Version history: View past versions of the page going back several days, depending on what plan you're on.Import or sync from: You can add documents and data from a number of other apps (Evernote, Trello, Google Docs, etc.) to the page.Export: Download the page as a file to your computer. Databases get saved as CSV files, while non-database pages get saved as Markdown files. You can also export your page or database as PDF or HTML.
A workspace operates slightly differently if you're using it with a team than if you're using it on your own:
In personal workspaces, newly created pages will be private by default unless they're explicitly shared.
Sidebar organization under the
Teamspacesection is also viewable by all members. The page arrangement will look the same to everyone, although individuals can toggle different pages open or closed without affecting everyone's view.On Notion's Plus, Business, or Enterprise Plan, there are members and admins with different levels of permission. Learn more about sharing and permissions here →
Câu hỏi thường gặp
Tôi có thể chuyển đổi giữa các không gian làm việc được liên kết với các địa chỉ email khác nhau không?
Tôi có thể chuyển đổi giữa các không gian làm việc được liên kết với các địa chỉ email khác nhau không?
Để thêm các không gian làm việc từ một tài khoản email khác, hãy sử dụng nút Thêm tài khoản khác trong bộ chuyển đổi không gian làm việc ở phía trên bên trái cửa sổ Notion của bạn và làm theo các bước để đăng nhập vào tài khoản khác của bạn. Xem thêm tại đây →
Tôi đã nhấp vào nút Tạo hoặc Tham gia không gian làm việc, nhưng nó chỉ cho phép tôi tạo không gian làm việc. Làm thế nào để tôi tham gia một không gian làm việc?
Tôi đã nhấp vào nút Tạo hoặc Tham gia không gian làm việc, nhưng nó chỉ cho phép tôi tạo không gian làm việc. Làm thế nào để tôi tham gia một không gian làm việc?
Bạn chỉ có thể tham gia không gian làm việc thông qua nút Tạo hoặc Tham gia không gian làm việc nếu không gian làm việc đó đã bật tùy chọn cài đặt Tên miền email được phép, cho phép người dùng có tên miền email của bạn tự động tham gia không gian làm việc.
Để tham gia một không gian làm việc, bạn cần yêu cầu quản trị viên từ không gian làm việc đó gửi lời mời cho bạn.
Để thêm các không gian làm việc từ một tài khoản email khác, hãy sử dụng nút Thêm tài khoản khác trong bộ chuyển đổi không gian làm việc ở phía trên bên trái cửa sổ Notion của bạn và làm theo các bước để đăng nhập vào tài khoản khác của bạn. Xem thêm tại đây →
Thanh bên của tôi không có phần nào cả. Làm thế nào để tôi bật các phần đó?
Thanh bên của tôi không có phần nào cả. Làm thế nào để tôi bật các phần đó?
Các phần trên thanh bên phản ánh cài đặt chia sẻ tài khoản của bạn. Nếu bạn có nhiều hơn một người trong không gian làm việc của mình, phần Không gian nhóm sẽ xuất hiện trên thanh bên để bạn cộng tác với người đó, và phần Riêng tư dành cho các trang cá nhân chỉ mình bạn nhìn thấy.
Khi tôi đăng ký Gói Plus, gói này có bao gồm tất cả các không gian làm việc của tôi không?
Khi tôi đăng ký Gói Plus, gói này có bao gồm tất cả các không gian làm việc của tôi không?
Các gói trả phí chỉ áp dụng cho một không gian làm việc và không bao gồm toàn bộ tài khoản. Các không gian làm việc hoàn toàn tách biệt, vì vậy bạn sẽ không thể liên kết bất kỳ nội dung nào giữa chúng.
Chúng tôi khuyên bạn nên sử dụng số lượng không gian làm việc ít nhất có thể và tận dụng các trang cấp cao trong thanh bên để giữ mọi thứ ngăn nắp.
Làm thế nào để tôi có thể di chuyển tất cả nội dung Notion của mình sang một không gian làm việc khác?
Làm thế nào để tôi có thể di chuyển tất cả nội dung Notion của mình sang một không gian làm việc khác?
Ghi chú: Bất kỳ nội dung nào được di chuyển sẽ được sao chép sang không gian làm việc mới và các trang này đôi khi gặp sự cố. Để biết thêm thông tin, nhấp vào đây.
Để di chuyển nội dung của bạn từ không gian làm việc này sang không gian làm việc khác được liên kết với cùng một tài khoản, hãy nhấp vào ••• bên cạnh mỗi trang cấp cao trong thanh bên của bạn (hoặc nhấp chuột phải) và chọn Di chuyển đến. Ở cuối menu di chuyển, bạn sẽ thấy một menu thả xuống để chọn một không gian làm việc khác.
Khi bạn di chuyển các trang cấp cao, tất cả các trang phụ của chúng cũng sẽ được di chuyển theo. Chúng sẽ xuất hiện trong phần Riêng tư nhưng có thể được di chuyển đến bất cứ nơi nào bạn muốn.
Nếu tôi vô tình xóa vĩnh viễn thứ gì đó thì sao? Có cách nào để khôi phục lại không?
Nếu tôi vô tình xóa vĩnh viễn thứ gì đó thì sao? Có cách nào để khôi phục lại không?
Nếu bạn vô tình xóa một trang, một không gian làm việc hoặc thậm chí toàn bộ tài khoản của mình, chúng tôi có thể giúp! Sự cố vẫn thường xảy ra 😅 Chỉ cần gửi tin nhắn cho chúng tôi trong ứng dụng bằng cách nhấp vào ? ở cuối thanh bên của bạn hoặc gửi email cho chúng tôi theo địa chỉ [email protected].
Chúng tôi có lưu giữ các bản sao lưu cơ sở dữ liệu, nhờ đó chúng tôi có thể khôi phục phiên bản nội dung của bạn trong 30 ngày qua, nếu bạn cần đến.
Làm thế nào để tôi đăng xuất khỏi tài khoản Notion của mình?
Làm thế nào để tôi đăng xuất khỏi tài khoản Notion của mình?
Nhấp vào tên không gian làm việc hiện tại của bạn ở góc trên cùng bên trái thanh bên. Cuộn xuống dưới cùng, bạn sẽ thấy tùy chọn Đăng xuất bên cạnh địa chỉ email của mình.